Powered By Blogger

Wednesday, December 25, 2013

[Tip] Hide / Remove Search Box and Up Button from Windows 8 and 8.1 Explorer


If you are using Windows 8 or Windows 8.1 or if you are following this website regularly, you might be aware of the fact that Microsoft has improved Windows Explorer functionality a lot in these new Windows versions. Microsoft has put options to hide/remove favorites, libraries from Windows Explorer navigation pane in Windows 8/8.1. You can also easily mount ISO and VHD files in Windows 8/8.1 Explorer without using any 3rd party software as mentioned here.


But there are a still few annoyances present in Windows 8/8.1 Explorer such as combined "Devices and drives" group by section, 6 extra folders in Windows Explorer, Details Pane at right instead of bottom, etc.


Apart from the above mentioned annoyances, there are 2 other things which many Windows 8/8.1 users complain about. These are "Up button" and Search box in Windows 8/8.1 Explorer.


When Microsoft removed Up button from Windows Explorer in Windows Vista and Windows 7, many people complained about this move and Microsoft decided to put Up button back in Windows 8/8.1 Explorer. But as they say you can't please everyone. Many Windows 8/8.1 users started complaining about no option given to hide or remove Up button from Windows Explorer.


Regarding search box, in Windows 7 you were able to remove search box from Windows Explorer by simply removing Windows Search component using "Programs and Features" in Control Panel but Windows 8/8.1 Explorer don't allow you to remove search box.


Although Windows 8 and 8.1 don't allow you to remove Up button and Search box from Windows Explorer, we are sharing a free and portable tool which will help you in hiding/removing both these things quickly and easily.


"Windows 8.x Explorer Rebar Tweaker" is a small, portable and free software which can be used to remove up button and search box from Windows 8 and 8.1 Explorer. It also allows you to change the padding between addressbar and search box in Windows Explorer as well as customizing back/forward buttons width.


    Using this little freeware is very easy. You just need to run its EXE file and it'll start running in background. Now you can run "ConfigurationGUI.exe" file to customize options such as: 
  • Show/hide Up button
  • Show/hide Search box
  • Change Rebar padding (extra space between addressbar and search box)
  • Change navigation buttons (back/forward) width


    Apply your changes and close all running Windows Explorer windows. Open
Windows Explorer again and you'll see the changes immediately without restarting Explorer process or Windows.


This program stores all settings in an INI file present in the same folder, so you can also modify the INI file to change settings.


There are 2 separate EXE files available of this program for 32-bit (x86) and 64-bit (x64) Windows editions.


Interested people can download the program using following link:

Thursday, July 5, 2012

How to Move / Show “Navigation Pane” at Right in Windows 7 Explorer?

Here is another interesting stuff for Windows customization lovers. We have told you in past how to move "Details Pane" at top in Windows Vista and Windows 7 Explorer:
How to Move / Show “Details Pane” at Top in Windows Vista and 7 Explorer?
Today its turn of "Navigation Pane"! Navigation Pane is shown at left in Windows Explorer and helps you in switching to drives and directories with the help of a single mouse click.
This article will help you in moving Navigation Pane to right in Windows 7 Explorer. Following is a preview of the output:


Believe me it looks great and I found it quite easy to use. If you also want to move Navigation Pane to right-side area of Windows 7 Explorer, simply follow these simple steps:
1. To move the Navigation Pane to right-side, you'll need to edit "%windir%\System32\Shell32.dll" in Resource Hacker and replace lots of occurrence of "Left" test string with "Right". You'll need to replace it in following sections of the file while editing it in Resource Hacker:
UIFILE -> 3, 4, 5, 6, 15, 16, 19, 20, 21, 31, 46, 53, 54, 56, 57, 58
It'll require expertise and a small mistake will make your system not bootable.
For your convenience, we are sharing ready-made Shell32.dll file. This file is available for both 32-bit (x86) and 64-bit (x64) Windows 7 editions.
Download Shell32.dll File for Windows 7 (32-bit)
Download Shell32.dll File for Windows 7 (64-bit)
2. Once you download the file, extract it using 7-Zip or WinRAR and you'll get the required Shell32.dll file.
3. Now you'll need to replace existing Shell32.dll file present in "Windows\System32" folder with this new downloaded one.
4. Once you take ownership, rename original "Shell32.dll" file present in "System32" folder to "Shell32_backup.dll".
5. Now copy your new downloaded "Shell32.dll" file to "System32" folder.
6. Restart your system and after restart Windows will start using your new Shell32.dll file and you'll get Navigation Pane at right-side of Windows Explorer.

[Direct Download Links] Windows 8 Release Preview (RC Build)

As you know that Microsoft has released "Release Preview" (Release Candidate) build of Windows 8 to public which can be downloaded using following topic:
Windows 8 Release Preview (RC Build) Released, Download Now
For your convenience, we are going to share direct download links for Windows 8 Release Preview build so that you don't need to go anywhere else. Just click on the download link and it'll start downloading Windows 8 Release Preview to your PC:
Windows_8_New_Logo.png
English
64-bit (x64) Download (3.3 GB)
32-bit (x86) Download (2.5 GB)
Arabic
64-bit (x64) Download (3.3 GB)
32-bit (x86) Download (2.5 GB)
Chinese (Simplified)
64-bit (x64) Download (3.4 GB)
32-bit (x86) Download (2.6 GB)
Chinese (Traditional)
64-bit (x64) Download (3.4 GB)
32-bit (x86) Download (2.6 GB)
French
64-bit (x64) Download (3.3 GB)
32-bit (x86) Download (2.5 GB)
German
64-bit (x64) Download (3.3 GB)
32-bit (x86) Download (2.5 GB)
Japanese
64-bit (x64) Download (3.3 GB)
32-bit (x86) Download (2.5 GB)
Korean
64-bit (x64) Download (3.3 GB)
32-bit (x86) Download (2.5 GB)
Portuguese (Brazil)
64-bit (x64) Download (3.3 GB)
32-bit (x86) Download (2.5 GB)
Russian
64-bit (x64) Download (3.3 GB)
32-bit (x86) Download (2.5 GB)
Spanish
64-bit (x64) Download (3.3 GB)
32-bit (x86) Download (2.5 GB)
Swedish
64-bit (x64) Download (3.3 GB)
32-bit (x86) Download (2.5 GB)
Turkish
64-bit (x64) Download (3.3 GB)
32-bit (x86) Download (2.5 GB)
When you'll run Windows 8 Release Preview setup, it'll ask for a product key. You can use following product key provided by Microsoft:
TK8TP-9JN6P-7X7WW-RFFTV-B7QPF

3 Application Compatibility Registry Tweaks to Boost Windows Vista and Windows 7 Performance

We all know about "Application Compatibility" feature of Windows Vista and Windows 7. It helps you in running old software programs which are not compatible with new Windows versions. It monitors your system and whenever you run a program, it looks through a compatibility database. If it finds a match for the running application, it offers you the solution or compatibility fixes. If a match is not found, it shows a message that the application has a known problem with current Windows version.
Application compatibility feature comes with 3 main components:
  • Application Compatibility Engine
  • Program Compatibility Assistant
  • SwitchBack Compatibility Engine
Application Compatibility Engine is the main part of the system loader and performs the check through program compatibility database.
Program Compatibility Assistant (PCA) monitors user initiated programs for known compatibility issues at run time and provides recommended solutions to the user.
SwitchBack Compatibility Engine provides older system behavior to older applications and new system behavior to new applications.
All these 3 components are enabled by default in Windows Vista and Windows 7. Turning off these features will boost your system performance. However it may degrade the compatibility of older applications and may not block known incompatible applications from installing. Also you'll not receive solutions to known compatibility issues when running applications.
Turning off "Application Compatibility" feature is useful for people who like faster systems and want to achieve maximum performance from their systems and are aware of compatibility of the applications they are using.
So if you want to make your Windows faster and don't care about application compatibility, you can follow these instructions to turn application compatibility feature off:
1. Type regedit in RUN or Start Menu search box and press Enter. It'll open Registry Editor.
2. Now go to following key:
HKEY_LOCAL_MACHINE\SOFTWARE\Policies\Microsoft\Windows\
3. Create a new key AppCompat under Windows key.
4. Select new AppCompat key and in right-side pane, create following 3 new DWORD values:
  • DisableEngine
  • DisablePCA
  • SbEnable
5. Set values of DisableEngine and DisablePCA to 1 and value of SbEnable to 0
6. If you are using 64-bit Windows edition, you'll also need to follow the same steps 3-5 for following key:
HKEY_LOCAL_MACHINE\SOFTWARE\Wow6432Node\Policies\Microsoft\Windows\
7. That's it. Close Registry Editor and restart your system to take effect.
Now you should notice faster system performance but you'll be unable to enjoy application compatibility feature.
PS: If you want to restore default settings and want to enable application compatibility feature, just remove the 3 DWORD values created in step 4.
NOTE: If you don't want to modify Registry manually and want a ready-made Registry script to do the task automatically, download following ZIP file, extract it and run the extracted REG file. It'll ask for confirmation, accept it:

Download Registry Script

Monday, April 9, 2012

Download Adobe Photoshop CS6 Beta Version for Free

Adobe Photoshop is one of the best and most popular image editing software available for Windows and Mac. It allows you to modify and enhance your photographs like professionals. You can create awesome images using this great tool.
Windows theme creators like me use Adobe Photoshop to create image resources to put in themes and skins.
Adobe Photoshop is not a freeware and you need to purchase it but now you can test it for free. The latest beta of Adobe Photoshop version CS6 is available absolutely free to download.
This free beta version is available for Windows and Mac. The final version is expected to release in first half of 2012.
What's New?
According to Adobe, Photoshop CS6 comes with huge performance enhancements, imaging magic and creativity tools that offer users a new experience in digital imaging.
Some of the key features include new additions to the Content-Aware tools. Content-Aware Patch allows greater control by letting users select and duplicate an area of an image to fill in or "patch" another and Content-Aware Move lets users select and magically move an object to a new place in the image.
In addition, the Photoshop CS6 beta offers all the features of Adobe Photoshop CS6 and Adobe Photoshop CS6 Extended, such as new 3D editing features and quantitative imaging analysis capabilities.
System Requirements:
  • Processor: Intel P4 or AMD Athlon 64
  • RAM: 1 GB
  • Hard Disk Space: 1 GB for Windows, 2 GB for Mac
  • OpenGL 2.0 capable system
  • Screen Resolution: 1024x768 (1280x800 recommended) with 16-bit color and 256MB of VRAM
  • OS: Windows XP SP3, Windows 7 SP1, Mac OS X v10.0.8 or v 10.7
Adobe_Photoshop_CS6.png
This free download of Adobe Photoshop is available in English and Japanese languages.
Please note that the setup does NOT require any product key or serial number to enter. Simply select "Try. I want to try Adobe Photoshop CS6 for a limited time" option in the Welcome Screen when you start the installation process. But your Adobe ID login and online activation are required either at installation or within seven days after your first launch of the Photoshop CS6 beta. You can register for a free Adobe ID without any problem using the wizard.
You can download the free beta of Adobe Photoshop CS6 using following direct download links:
Download Adobe Photoshop CS6 Free Beta for Windows (1.7 GB)
Download Adobe Photoshop CS6 Free Beta for Mac (984 MB)

Windows 8 “Win+X” Menu in Windows 7 Desktop Context Menu

When you right-click on extreme bottom-left corner of screen, you get a new hidden menu showing shortcuts to lots of useful system tools such as Task Manager, Control Panel, Run, Power Options, Command Prompt, etc. You can also access this hidden menu using "Win+X" keyboard shortcut, that's why its also called "Win+X Menu".
Following is a screenshot of Win+X menu present in Windows 8:
Windows_8_Consumer_Preview_Quick_Access_Menu.png
If you are not using Windows 8 but want to have a similar thing in Windows 7, here is something interesting for you!
Today in this topic, we are going to provide some ready-made registry scripts which will bring Windows 8 "Win+X" Menu to Windows 7 Desktop.
Although we can't get the Win+X Menu at the same location in Windows 7 but we can add it to Desktop context menu so that you can access it quickly and easily by just right-clicking on Desktop.
We have used the same method in creating this Win+X Menu for Windows 7 which was mentioned long time back in following exclusive tutorial:
Add Cascading Menus for Your Favorite Programs in Windows 7 Desktop Context Menu
Using the above mentioned tutorial, we have created a few Registry scripts which can add a new cascading menu in Desktop context menu containing all the shortcuts present in Windows 8 "Win+X" Menu. You can put this Win+X Menu at top, middle or bottom of Desktop context menu.
You can also select whether you want to show icons for all shortcuts or want to have a clean menu without icons similar to Windows 8 Win+X Menu.
Following is a preview of Win+X Menu added in Windows 7:
Windows_8_Win%2BX_Menu_Windows_7.png
And following is an example of how the "Win+X" Menu looks in different positions:
Windows_8_Win%2BX_Menu_Position.png
To add Win+X Menu in Windows 7 Desktop context menu, you just need to download following ZIP file, extract it and run the appropriate REG file:
Download Registry Scripts to Get Windows 8 Win+X Menu in Windows 7
Once you extract the ZIP file, you'll get 3 folders:
  • Add Win+X Menu with Icons
  • Add Win+X Menu without Icons
  • For German Language Users
All these 3 folders contain REG files to add Win+X Menu in Windows 7 Desktop context menu at top, middle or bottom. Just run the desired REG file, it'll ask for confirmation, accept it. That's it. It'll immediately add "Win+X" Menu at desired position in Desktop context menu. "For German Language Users" folder contains the same registry scripts to add Win+X Menu in German language.
An extra REG file "Uninstall.reg" is also available in ZIP file to remove the Win+X Menu if you don't like it and want to remove it.
You can also watch following video showing this "Win+X" Menu in action in Windows 7 along with a working demo:
Feel free to share your feedback or suggestions in your comment...

Tuesday, January 3, 2012

Facebook Messenger for Windows Released, Direct Download Link Inside

If you are a Facebook user, here is an exciting news for you. Facebook team has released the official Facebook Messenger for Windows users.
Facebook Messenger is basically a chat client for Windows which allows you to chat with your Facebook friends without going to Facebook website using a web browser. So you can consider it similar to Windows Live Messenger or Yahoo! Messenger.
Using Facebook Messenger, you can:
  • Chat and message with your friends on Facebook
  • See the latest updates from your friends in ticker
  • Get quick notifications about what’s going on
Facebook Messenger can only be installed in Windows 7 at the moment. When you install it, it asks you to login using web browser. As soon as you log into your Facebook account in web browser, the messenger application automatically logs you in.
The interface looks as shown in following screenshot:
Facebook_Messenger.png
As you can see the UI is very simple and similar to Facebook website UI which helps you in getting the same feeling which you get while browsing Facebook website.
The messenger window also allows you to dock it to the right-side of your computer screen which makes it look-like a Desktop sidebar. To dock it, you just need to click on the small icon given at the extreme bottom-right corner of messenger window. Or you can right-click on messenger icon in system tray and select "Dock Window to Right" option. To put it back, you can either deselect the option or click on the same icon present in bottom-right corner of messenger window.
You can log out anytime by right-click on its system tray icon and select "Log out" option. Keep in mind, it'll also log you out from main Facebook website in your browser.
You can download it using following direct link:
Download Facebook Messenger
You can join us on Facebook using our official Facebook page:
Join us on Facebook

Thursday, November 17, 2011

JQS.Exe is vuris??let see it is true or not...

Experienced computer users might guess that the process is related to Java and that is the case indeed. Jqs.exe is the Java Quick Starter which was designed to improve the startup time of Java applets and applications by prefetching Java Runtime Environment (JRE) files frequently into memory. That’s mainly interesting for users who work with Java on a day to day basis. Everyone else might be better of disabling the Java Quick Starter. Think of a user who encounters one Java applet per month (or week), would it make sense to run the process all the time because of those few instances where it might start the application or applet faster? (see also Java Portable on how to use a portable version of Java on the computer)
Jqs.exe is definitely querying the Windows Registry for instance. The performance increase might not be huge but you will free up some computer memory and some I/O processes on the computer system.
jqs exe
How to disable JQS.exe
Now, if you want to disable the Java Quick Starter process you can do that in the Windows Control Panel. You find a Java entry there which will open the Java Control Panel.
A click on Advanced and the selection of Miscellaneous will display the activated Java Quick Starter entry. Uncheck the box to disable the process. This will be visible in the Windows Task Manager immediately.
java quickstarter
java quickstarter
You might also be interested in finding out how to run Java Portable which is another option to make sure that no background processes are running.
Interested in finding out what other processes on your system are doing? Check out our Process listing for that.
Update: Several commenters mentioned that using the Java Control Applet to disable jqs.exe will only disable the program from running for the logged in user. Another method to disable the Java background process is more appropriate for multi-user systems:
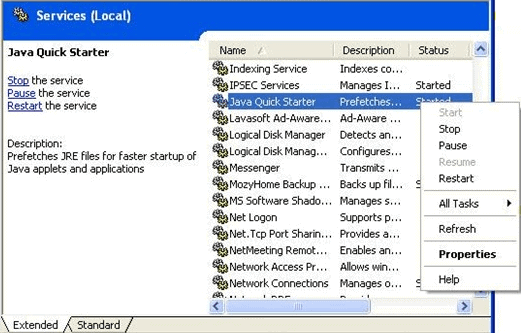
You need to press Windows-R, type in services.msc and hit enter. This opens the Windows Services configuration window. Locate the Java Quick Starter service from the listing and right-click it.
java quick starter
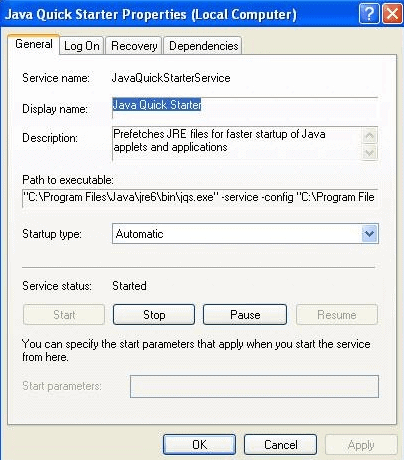
Select Properties from the menu, this opens a new window with details about the process.
disable java quick starter
Click on the Stop button to stop the Java Quick Starter button and thus jqs.exe from running in the current session. You also need to change the startup type from automatic to disabled to prevent that it is loaded on the next start of the Windows operating system. Once done click Apply and then Ok to close the window.

How to Change SATA Hard Disk Mode from IDE to AHCI / RAID in BIOS after Installing Windows?

Today we are going to address a very common but one of the most irritating problems in this tutorial.
Consider following scenario:
You got a new computer system in which the SATA hard disk controller mode in BIOS settings was set to IDE ( or IDE Compatibility or Standard IDE) instead of AHCI (Advanced Host Controller Interface) or RAID for better compatibility. You didn't notice that and installed Windows. After sometime you realized it and changed the SATA mode from IDE to AHCI or RAID in BIOS and BOOM!!! You made your Windows crashed. Windows will no longer start and will show a BSOD (Blue Screen Of Death) containing error code "STOP 0x0000007B INACCESSABLE_BOOT_DEVICE".
http://media.askvg.com/articles/images3/Windows_BSOD.png
Why??? Because Windows can't load the new drivers for AHCI or RAID interface. Actually when Windows is installed, it automatically disables unused storage drivers to speed up Windows startup process.
As a temporary fix, you can reset the SATA mode from AHCI or RAID to IDE in BIOS but you'll find yourself in the same situation. Or you can reinstall Windows but that would require lots of time and efforts.
Then how to switch SATA hard disk mode from IDE to AHCI or RAID in BIOS after installing Windows so that you would not need to repair or reinstall Windows?
Here is the solution! You just need to tell Windows that hard disk mode is going to change upon reboot using Windows Registry and Windows will automatically detect the mode and will install the required drivers and you'll be able to successfully change the SATA mode in BIOS without any need to reinstall Windows.
So without wasting time lets start the tutorial:
1. First DO NOT change SATA hard disk mode settings in BIOS, leave it to the default settings which were used while installing Windows.
2. Now start Windows and type regedit in RUN or startmenu search box and press Enter. It'll open Registry Editor.
3. Now go to following keys one by one:
HKEY_LOCAL_MACHINE\SYSTEM\CurrentControlSet\services\msahci
HKEY_LOCAL_MACHINE\SYSTEM\CurrentControlSet\services\pciide
In right-side pane, look for a DWORD "Start". Double-click on it and set its value to 0 (That's zero and not alphabet O).
http://media.askvg.com/articles/images3/Reset_SATA_Hard_Disk_Mode_AHCI_Settings.png
http://media.askvg.com/articles/images3/Reset_SATA_Hard_Disk_Mode_IDE_Settings.png
4. If you are using RAID or other interface, do the same thing for following key as well:
HKEY_LOCAL_MACHINE\SYSTEM\CurrentControlSet\services\iaStorV
In right-side pane, look for a DWORD "Start". Double-click on it and set its value to 0 (That's zero and not alphabet O).
http://media.askvg.com/articles/images3/Reset_SATA_Hard_Disk_Mode_RAID_Settings.png
5. That's it. It'll reset the hard disk mode settings in Windows registry. Close Registry Editor and restart your system.
6. Now enter into BIOS settings and change SATA hard disk mode to AHCI or RAID according to your requirements.
http://media.askvg.com/articles/images3/Change_SATA_Hard_Disk_Controller_Mode_BIOS.png
7. As soon as Windows will start booting, it'll automatically detect the change and will install the appropriate drivers. Once the drivers are installed, Windows will boot without any problem and you'll not need to reinstall Windows just to change SATA hard disk mode.
PS: If you don't want to edit the registry manually and want a ready-made registry script to do the task automatically, download following ZIP file, extract it and run the extracted REG file. It'll ask for confirmation, accept it:
Download Registry Script

Saturday, November 5, 2011

Transform Windows 7 into Android 4.0 (Ice Cream Sandwich) Using “Android Skin Pack 2.0″

UPDATE: New version 2.0 released which comes with new theme and other UI stuff to make Windows 7 look-like Android 4.0 Ice Cream Sandwich.
NOTE: This skin pack also comes with a 3rd party browser toolbar. If you don't want to install the toolbar, select "Custom Installation (Advanced)" type and uncheck all 3 options given at the time of installation.
We have shared many transformation packs for Windows 7 users like Mac OS X transformation pack, Windows 8 skin pack, Ubuntu skin pack, etc.
Today its turn of Android skin pack. If you want to make Windows 7 look-like Google Android OS, this transformation pack will definitely help you.
"Android Skin Pack" is a new customization pack for Windows 7 created by "hameddanger" @ DA. This new pack comes with cool Android theme, boot screen, login screen, icons, cursors, wallpaper, dock and much more.
This skin pack completely transforms Windows 7 into Android OS. Following is a preview of this skin pack in action:
Android_Skin_Pack_for_Windows_7.png
It supports both 32-bit and 64-bit versions.
You can download it using following link:
Download Link (32-bit)
Download Link (64-bit)
NOTE: Please create a system restore point before installing this skin pack so that you can restore default Windows look in case you don't like the new look or face any problem.
You should also check out following Android wallpapers to provide more Android feeling to your Windows 7 Desktop:
Download Top 10 Unofficial Android Wallpapers

Tweak Me: Excellent Windows Tweaker, Temp File Cleaner, Startup Manager and Context Menu Editor

Today we are going to share an excellent and very useful freeware for Windows XP, Windows Vista, Windows 7 and Windows 8 Developer Preview.
"Tweak Me" can be considered as a powerful pack of various useful utilities which are generally downloaded and installed separately. It comes with following components:
  • Windows Tweaker
  • Temp File Cleaner
  • Startup Manager
  • Context Menu Editor
The first component "Windows Tweaker" allows you to tweak lots of hidden settings in Windows like disable Action Center, customize Aero glass effects, tweak Internet Explorer, Windows Media Player, Windows Update, User Account Control, etc. It also allows you to enable/disable various features to increase system performance and security.
Tweak_Me_Tweaks_Page.png
Second component "Cleaner" is an alternative to CCleaner. It allows you to delete various temporary files from your system to get free space on your hard disk. You can clear browser cache, cookies, history, logs, driver cache and much more. Just select the desired options and click on "Analyze" button to get info about how much free space will you get after removing the temp files. When decided, you can click on "Clean" button to remove the temp files.
Tweak_Me_Cleaner_Page.png
"Startup" is a replacement for Windows built-in msconfig utility which allows you to enable/disable startup programs to make Windows startup faster. Simply uncheck the checkbox for a program which you don't want to start with Windows.
Tweak_Me_Startup_Page.png
"Context Menu" page allows you to remove unnecessary or unwanted options from context menu (right-click menu) of files, folders, drives, etc. It shows a list of all options available, you can uncheck the options which you don't want to see in context menu.
Tweak_Me_Context_Menu_Page.png
Apart from these 4 components, it also allows you to tweak settings related to SSD optimization. To access these settings, click on "Tweak Me!" button and select "SSD Optimization" option. Here you can enable/disable various options.
Tweak_Me_SSD_Optimization.png
Last but not least, the program also allows you to fix various system features like Boot defragmentation, prefetch, superfetch, hibernation, burning function, etc. Click on "Tweak Me!" button and select "Fixes" option. Now you can restore settings for these system features by clicking on "Restore Settings" button given for each feature.
Tweak_Me_System_Fixes.png
As a bonus this program also allows you to tweak various things in Windows 8 Developer Preview like enable old start menu, start Windows Explorer with ribbons minimized, enable snap feature for low resolutions, etc.
You can see its an ultimate tweaking utility for Windows which is absolutely free to download.
You can download it using following link:
Download Link

Monday, October 10, 2011

Steve Jobs: Here’s To You

Former Apple CEO Steve Jobs passed away last night at the age of 56.
Regardless of your opinion on Apple’s products, services and business approach, the impact Apple has had on technology under Steve’s vision will be felt for a long time to come.
“Steve was among the greatest of American innovators – brave enough to think differently, bold enough to believe he could change the world, and talented enough to do it”~ Barack Obama
This ‘impact’ can be seen in the condolences being expressed in the media: from Barack Obama and Bill Gates, to Mark Zuckerberg and Google’s Eric Schmidt.
It seems that no matter which side of the fence people were on regarding Apple and their business approach all appreciated their neighbour next door.
And rightly so: Whilst many may see Apple as an emerging evil keen to stave off competition, for everyday users they simply made computing easy and fuss free. An approach that has undoubtedly helped shape, inform and spur innovation in other operating systems – including our own.
Here’s to you Mr Jobs – your legacy will be long felt.

Three Nifty Gnome Shell Extensions That Use Zeitgeist

Over the last few weeks I have been working on some nifty Zeitgeist extensions for GNOME Shell. I finally managed to finish all of these Zeitgeist extensions, and figured I’d share them with the OMG! Ubuntu! audience. Here’s a brief rundown and instructions on how to install.

Journal

The first extension adds the “Journal” overview which allows you to navigate through your Recently Used stuff, categorized by type of files (documents/videos/music/other/…) as well as type of interaction (recent/frequent/new). This is something Akshay Gupta, Federico Mena and me have been working on and we will be working on it more in the coming weeks to fix and improve the view…

Zeitgeist-Search

One of the most annoying things about the Shell search is the semi-random order of results we get for matching applications (see https://bugzilla.gnome.org/show_bug.cgi?id=623372). This is now fixed. Also the search in recently used could be improved by categorizing them by types (documents/videos/etc..)

Jump-lists

Last but not least I managed to finish a jump-list extension that is pretty nifty and works like charm. Basically if your application reports to Zeitgeist what it is doing (install datap sources from https://code.launchpad.net/~zeitgeist-dataproviders/zeitgeist-datasources/trunk) you will have the awesome functionality of being able to right click on an app and retrieving the 4 recent items used with it as well as other 3 frequent items used.

Where to get it?

Simple just get it from my git repo (https://github.com/seiflotfy/gnome-shell-zeitgeist-extension) by doing
git clone git://github.com/seiflotfy/gnome-shell-zeitgeist-extension.git
Note: You need Zeitgeist to run this! Make sure that both zeitgeist-daemon and zeitgeist-datahub are running.

Credits…

Thanks to Federico and Akshay for their amazing work and Jasper St. Pierre and Colin Walters for guiding me through the unconventional methods to get this running. Also thanks to Collabora for sponsoring my efforts…
Here is a video demo of the 3 extensions or download it from here
Related posts:

Looking For a Beautiful GNOME Shell Theme? Try ‘Nord’

GNOME Shell users are spoilt for choice when it comes to beautiful looking ‘Shell’ themes – a fact made even more apparent with the updated release of 0rAX0‘s ‘Nord’ theme.
The theme has been rewritten to support GNOME 3.2 (which you’ll find readily available in next weeks Ubuntu 11.10 release) and gained new scrollbars.
Due to the rewrite the developer notes that the update should be considered a ‘beta release’, so if you’re already willing and able to install it do bear this in mind.
Click to Download GNOME Shell Theme 'Nord'Installation is typical for GNOME Shell themes: -
  • Download and extract the ‘Nord’ folder to the .themes directory inside your Home folder, using the ‘Theme Selector’ GNOME Shell extension to select it.
  • Alternatively backup then replace /usr/share/gnome-shell/theme with the Nord theme.

A Google-Inspired GNOME Shell Theme

If you use a Google service – whether it’s Docs or Gmail – chances are you’ve noticed that a ‘new theme’ has been rolled out across their various web apps. 
On the plus side the changes offer a consistent look and style across Google’s many web apps, with minimalistic looking themes using lots of white space. On the not-so-plus side they lack contrast; all that white can be very harsh on the eyes early in the morning…
DeviantArt user ~plaidcounty has taken cues from Google’s new look to craft together a “Google” style GNOME-Shell theme.
And it looks pretty freaking awesome: -
The theme, for the most part, is a pretty accurate implementation – even the GNOME panel takes the colour from Google’s newly-darkened navigation bar, and looks all the more awesome for it.
On the downside the theme doesn’t come with a matching GTK theme. It also requires the installation of the Droid font family in order to look “the biz”.
Installation is typical of GNOME Shell: Either put the ‘Google’ theme folder inside ~/.themes and use the theme-selector extension to enable it. If you’re lacking that extension you will need to back-up your /usr/share/gnome-shell/theme folder and replace everything inside it with this theme using a root Nautilus window.

How to Dual Boot OS X and Ubuntu

Dual-booting on a PC is easy: you stick in a LiveCD disk, drum your fingers for a few minutes then let the installer take care of all the difficult stuff.
But how does one dual-boot Ubuntu on a Mac?
It’s actually not that difficult; there are various guides and how-to’s on the internet. But to help clarify the process I thought I would share the method I use.
Whilst I don’t guarantee that it will work for you (although in all honesty it should), be sure to make a back up of anything vital before attempting this. Seriously, do it.
Ready? Let’s begin…

Step one: Install rEFIt

Unlike a typical PC where the GRUB boot-loader is used to present your dual-boot options, Intel Mac users need to install something extra: ‘rEFIt’.
‘rEFIt’ is a visually slick (think BURG) boot-interrupter that allows you to boot between OS X and your Linux distribution(s) of choice.
rEFIt should be installed from within OS X, and doesn’t require the use of too many braincells to accomplish: -
  1. Download the rEFIt-0.14.dmg disk image and ‘mount’ it (double-click on it)
  2. Inside the ‘rEFIt’ filesystem/folder double-click on the “rEFIt.mpkg” package.
  3. Follow the instructions and select your Mac OS X installation volume as the destination volume for the install
If everything went well you will see the rEFIt boot menu appear on your next restart.
For extra peace of mind create a bookmark to the ‘Troubleshooting section‘ of the rEFIt website incase any issues arise.

Step two: Resize the disk in OS X

The next step is to make some space for your Ubuntu install. I typically do this in OS X because it’s easier.
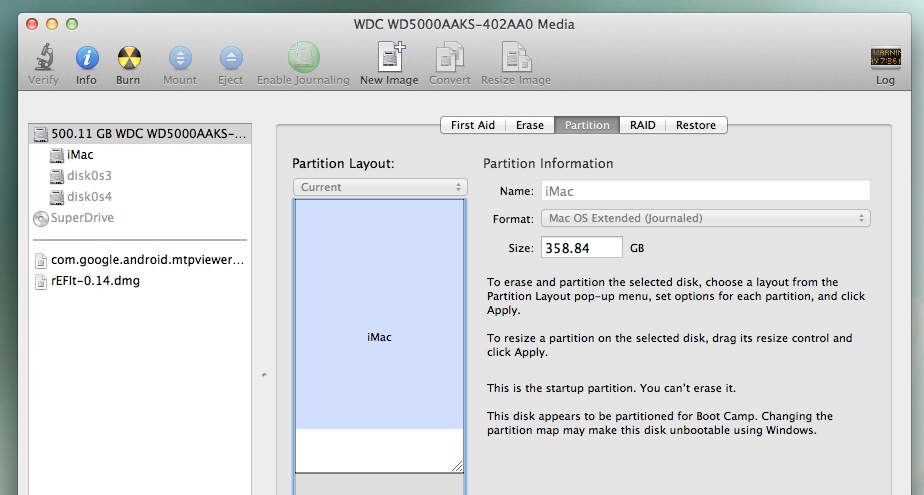
  • Open Disk Utility in OS X
  • Choose your main hard-drive from the left hand pane
  • Choose the ‘Partition‘ tab
  • Click the ‘+‘ sign to the bottom of the harddrive window and create a new partition by dragging the slider. You can also specify a partition size directly in the size box
  • For ‘Format‘ choose ‘Free Space’ (this will help us easily identify the partition later on)
  • Apply
Be generous when allocating disk space you need as trying to change it later can lead to all sorts of problems.

Step Three: Reboot with a LiveCD in the tray (and connect a wired keyboard and mouse)

Once you’re all set you just need to pop your LiveCD into the disk drive and reboot.
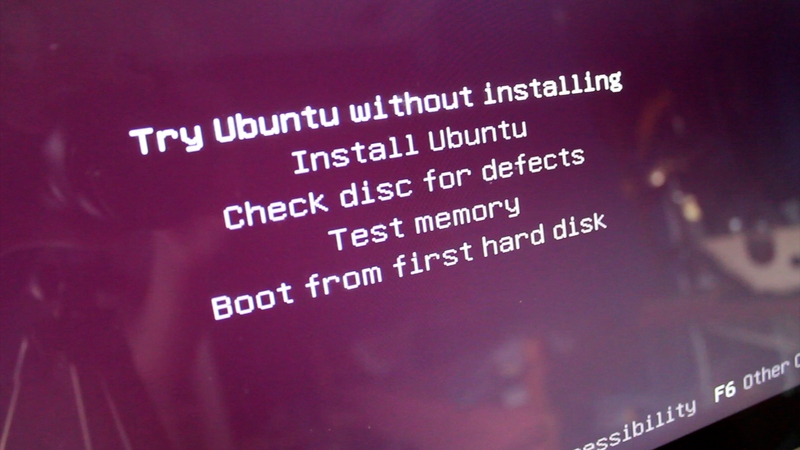
Press the ‘C’ after the start ‘chimes’ sound to boot from the Live CD.
Live CD

Step Four: Install to your created partition

If you’re an iMac user using bluetooth peripherals do be aware that these will not work out of the box in Ubuntu, so have a wired keyboard and mouse to hand.
Proceed to install Ubuntu on the ‘free space’ partition you created earlier. Ubuntu may prompt you to install it on freespace (double check the size) or, if it doesn’t or you just want to be super-cautious choose the ‘Advanced’ option from the partition screen. From here select (check the box under ‘format’) ‘free space‘ and choose the ‘EXT4′ filesystem when asked, and mount point should be set as ‘/’.
The above looks a bit crazy, but once you’re in the partition editor of the LiveCD it’s straightforward.
I should also add that I don’t usually bother adding Swap space but you may wish to.

Step Five: Reboot

Once all is done you just need to reboot your Mac and select ‘Linux’ from the REFit bootloader when it appears.
If you’re using a bluetooth keyboard you will need to press a button on your keyboard and wait a second before you are able to select boot entries with rEFIt.
Thanks to Beau for the idea

Sunday, October 9, 2011

Change DNS Settings in Windows Using DNS Changer

Many times people face problems while accessing a particular website. It might be due to website server problem. But sometimes it might be a fault of your Internet service provider as their DNS server was not updated within time. That's why its recommended to use external DNS instead of the DNS provided by your ISP.
There are many DNS available to use like Google Public DNS, Open DNS, etc. We have shared 2 freeware in past to automatically apply custom DNS which are DNS Jumper and Namebench.
Today we are going to share another free tool to automatically change DNS settings in Windows.
"Windows DNS Changer" is a free utility created by "milano88" @ DA which allows you to change DNS settings in Windows on the fly.
You can either select the predefined DNS like Google DNS, Open DNS and Sprint DNS or set your own desired DNS settings using this tool.
Windows_DNS_Changer.png
Just type the desired DNS settings and click on Apply button. It'll immediately set the custom DNS settings in Windows.
The software also plays a song in background which can be paused using the Play/Pause button.
Its a portable software so you don't need to install it. Simply run the EXE file.
You can download it using following link:
Download Windows DNS Changer

Comparison Between Windows 7 and Windows 8 Memory Management System

We all know that Windows 8 is under development and a Developer Preview build is available free to download for public.
We have shared a detailed review of Windows 8 Developer Preview build which can be read here. Microsoft has also talked a lot about Windows 8 new features and enhancements at Windows 8 blog.
Today Microsoft has shared some interesting details about Windows 8 memory management system at official Building Windows 8 blog.
According to Microsoft, their goal with Windows 8 from the beginning was to ship with the same system requirements as Windows 7. An important task for Windows 8 was to make room for new functionality while looking for opportunities to reduce the memory consumed by existing functionality and consumed across the board.
Windows 7 vs. Windows 8 Memory Consumption:
The easiest way to make a ballpark comparison of Windows 8 vs. Windows 7 memory use is to install both operating systems on a 1GB RAM machine (minimum OS RAM requirement) and compare them when they’ve been rebooted multiple times, and then idled for a while.
The below graphics compare memory consumption on an old netbook running Windows 7 at idle, and then with the same machine running Windows 8.
Windows_7_Windows_8_Memory_Consumption.png
As you can see though, Windows 8 is doing well relative to Windows 7.
NOTE: For Windows 8, a clean install also contains the extended Windows Defender technology, which, for the first time incorporates complete antimalware functionality – also optimized for memory and resource use. (This functionality does not exist on a clean install of Windows 7 where we would recommend that you add security software).
Memory Combining:
When assessing the contents of RAM in a typical running PC, many parts of memory have the same content. The redundant copies of data across system RAM present an opportunity to reduce the memory footprint even for services and OS components.
Memory combining is a technique in which Windows efficiently assesses the content of system RAM during normal activity and locates duplicate content across all system memory. Windows will then free up duplicates and keep a single copy. If the application tries to write to the memory in future, Windows will give it a private copy. All of this happens under the covers in the memory manager, with no impact on applications. This approach can liberate 10s to 100s of MBs of memory (depending on how many applications are running concurrently).
Service changes and reductions:
OS services configured to run all the time are a significant source of ambient memory use. When assessing the set of OS services during Windows 8 planning, Microsoft decided to remove a number of them (13), move a different set of services to "manual" start, and also made some of the "always running" services move to a "start on demand" model. This is where a "trigger" in the OS (like device arrival or the availability of a network address) causes the following to occur:
  • The service starts.
  • The service does its thing (whatever that happens to be).
  • It hangs around for a while to make sure there isn’t anything else to do, and
  • The service goes away.
You'll notice that Plug and Play, Windows Update, and the the user mode driver framework service are all trigger-started in Windows 8, in contrast to Windows 7, where these services were always running.
More granular prioritization of memory:
Windows 8 has a better scheme for the prioritization of memory allocations made by applications and system components. This means that Windows can make better decisions about what memory to keep around and what memory to remove sooner.
For example, antivirus programs (AV) do various checks on files when they are being opened by other programs. The memory that the AV program allocates to check virus signatures is usually a one-time allocation (it is unlikely that specific memory will be needed again). On Windows 7, the memory is treated as if it had the same priority in the system as other memory (say, memory allocated by a running instance of Microsoft Excel). If memory became scarce, Windows 7 could end up removing the memory that helps another running application (like Excel) stay responsive for the user, which wouldn’t be the best choice for system responsiveness in this case.
In Windows 8, any program has the ability to allocate memory as “low priority.” This is an important signal to Windows that if there is memory pressure, Windows can remove this low priority memory to make space, and it doesn’t affect other memory required to sustain the responsiveness of the system.
Now that's an impressive thing to know about Windows 8. It seems we'll not need to change services type to manual to speed up Windows 8 like previous Windows versions or will we need?

Sunday, September 4, 2011

KARPAL DAN MAT SABU (copy paste from chedet)


1. Akhbar melaporkan sesuatu yang pelik.
2. Sementara Mat Sabu memuji pengganas komunis, Karpal Singh pula mencuit perasaan Mat Sabu dan mempertahankan peranan yang dimainkan oleh anggota polis dan pasukan keselamatan Malaysia yang lain dalam menyelamatkan negara daripada pengganas.
3. Sungguh aneh sikap Karpal. Tetapi sebenarnya Karpal sebagai ahli politik amat cekap dan sedar akan kemarahan anggota keselamatan terhadap kenyataan Mat Sabu yang boleh mengurangkan sokongan mereka kepada Pakatan.
4. Sebab itu ia dengan pantas membuat kenyataan untuk mengurangkan kemarahan terhadap Mat Sabu dan seterusnya menyelamat Pakatan sedikit sebanyak.
5. Sesungguhnya di masa lampau terdapat satu usaha dikalangan pemimpin Pas untuk mempertahankan pengganas komunis. Sebabnya ialah kerana ingin mengurangkan rasa terhutang budi kepada pemimpin Umno dahulu yang telah dapat membatal rancangan Malayan Union British, menewaskan pengganas komunis dan memerdekakan negara.
6. Terdapat dikalangan murid sekolah yang diajar oleh entah siapa supaya berkata Tunku Abdul Rahman adalah pemimpin negara yang terburuk sekali.
7. Anwar Ibrahim pula pernah berjanji apabila sahaja ia menjadi Perdana Menteri ia akan benarkan Chin Peng kembali semula ke Malaysia.
8. Pas sekarang sudah gugur matlamat perjuangannya untuk menjadikan Malaysia negara Islam. Juga digugur ialah hasrat Pas untuk melaksanakan hukum hudud. Bersama dengan pembersihan pengganas komunis, Pas berharap kepercayaan DAP kepadanya akan memberi kemenangan kepada Pas apabila melawan Umno dalam PRU 13.
9. Aliran ini tidak sihat bagi Pakatan. Sedikit sebanyak sokongan rakyat, terutama dikalangan anggota pasukan keselamatan dan keluarga mereka akan terhakis. Saya percaya pemimpin yang lebih berpengalaman diantara mereka seperti Karpal Singh akan cuba mengurangkan kelancaran ke arah pembersihan komunis Malaysia untuk tidak terlalu memburukkan persepsi rakyat, khususnya mereka yang telah berkorban untuk menyelamatkan negara ini.
10. Walau apapun pendirian pemimpin Pas tidak akan menjejas kesetiaan pengikut mereka kerana fanatisme mereka tetapi janganlah pula orang lain juga membutakan mata akan kesanggupan Pas dan sudah tentu PKR, untuk menidakkan apa sahaja sumbangan pemimpin UMNO dahulu demi mendapat sokongan DAP dan orang Cina khususnya.
11. Pas sekarang tidak lagi Pas Ustaz Zulkifli, Burhanuddin Al-Helmi, Asri Muda. Pas sekarang sanggup membelakangkan Islam pun kerana gila kuasa dan Putrajaya. Na’uzubillah.